Creating Patterns
Image Editors
Since Designer is compatible with most bitmap files (.bmp) you can use any image editor you want to create patterns. If you don’t have an image editor on your computer, here are some suggestions:
- GIMP – Free, open-source, fully-featured image editor.
- Adobe Photoshop – Not free, but it’s the gold standard for image editors.
Pattern-making Tips
If the width of a .bmp is greater than the number of LEDs in your prop, the excess will be ignored. If you are trying to use high resolution images you’ll need to scale them down quite a bit.
If the width of a .bmp is less than the number of LEDs in your prop, the image will be repeated.
Extend battery life by using black backgrounds with your patterns. Black pixels don’t require turning on an LED so more black in your pattern means less power consumed.
If you’re trying to display a recognizable image on a hoop (for example, a band logo), you may want to resize it so the image width is about 1/3 of the number of LEDs in the hoop. This is because someone watching you hoop can only see about 1/3 of the hoop in their field of view.
Color Depth
You’ve probably heard the term 8-bit before in reference to retro video game graphics. When we’re talking about .bmp files, the term 8-bit refers to the color depth (the maximum number of colors that can be present in the image).
By default your image editor will probably save a .bmp as 24-bit (16+ million colors). At present your Designer is compatible with 24-bit, 8-bit, and 4-bit bitmaps. 16-bit bitmaps are currently not supported. 24-bit is the most compatible, easiest to edit, and probably the best choice for most users.
Creating Chaser Patterns
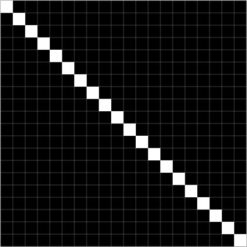
Chasers are an LED animation effect that appears like points of light “chasing” along the LED strip. When the spinning of a prop combines with the motion of a chaser, incredible illusions are created. Designer animates bitmaps one row at a time, from top to bottom, looping back to the top when finished. With the following image, the point of light appears to chase forwards by one pixel during each animation update.

To make your own chaser pattern you’ll start by creating an all-black bitmap. Then, draw a straight line from the top left corner to the bottom right corner. For best results, set the width of the bitmap to a number that divides evenly into the LED count of your prop. For example if you are using a hoop with 100 LEDs in it and your chaser bitmap is 20 pixels wide, you’ll see 5 chasers at a time.
Once you have a chaser pattern uploaded onto your prop you can use Options like ConstantSpeed and SpeedToggle to define how fast you want the chasers to move. A slower ConstantSpeed can look good when performing isolations and other off-body tricks. A faster ConstantSpeed creates an incredible illusion on a spinning hoop.