Remote Control
Using the Designer Remote
The Designer remote lets you control playback, navigate patterns and modes, adjust brightness, save favorites, and trigger advanced features while your prop is in use.
Most actions only require a quick button press. Some advanced features use a press-and-hold action.
Note: In this guide, the Heart button may also be referred to as the Special button because it has more than one function.
Quick Remote Basics
Most users will use these buttons the most:
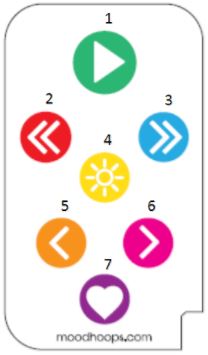
- Previous Pattern: Move to the previous pattern in the current Mode.
- Next Pattern: Move to the next pattern in the current Mode.
- Previous Mode: Move to the previous Mode folder.
- Next Mode: Move to the next Mode folder.
- Brightness: Cycle through the available brightness levels.
Remote Button Guide
| Button | Press | Hold |
|---|---|---|
| Autoplay | Set or adjust Autoplay timing by pressing the button two or more times to a beat. | Arm choreography playback when a choreography file is present. |
| Previous Mode | Navigate to the previous Mode folder alphabetically. | None |
| Next Mode | Navigate to the next Mode folder alphabetically. | None |
| Brightness | Cycle through brightness levels: low, medium, and high. | None |
| Previous Pattern | Navigate to the previous pattern alphabetically within the current Mode. | None |
| Next Pattern | Navigate to the next pattern alphabetically within the current Mode. | None |
| Heart / Special | Cycle between animation speeds defined by the SpeedToggle option. | Save the currently playing pattern to Favorites. |
Changing Patterns
Use the Previous Pattern and Next Pattern buttons to move through the patterns in the current Mode.
Patterns are sorted alphabetically within each Mode folder.
Changing Modes
Use the Previous Mode and Next Mode buttons to move between Mode folders.
Modes are sorted alphabetically by folder name.
Adjusting Brightness
Press the Brightness button to cycle through the available brightness levels:
- Low
- Medium
- High
Higher brightness will make the prop more vivid, but may reduce battery life. Lower brightness may extend battery life.
Using the Autoplay Button
The Autoplay button controls how quickly playback advances from one pattern to the next.
To set the Autoplay timing, press the Autoplay button two or more times to a beat. Designer will use that timing to determine how quickly it should advance to the next pattern.
For example:
- Tap once per second to advance patterns about once per second.
- Tap every four seconds to advance patterns about every four seconds.
If a choreography file is present in the current Mode folder, the Autoplay button can also be used to arm and begin choreography playback.
To trigger a choreography file:
- Navigate to the Mode folder that contains your choreography file.
- Hold the Autoplay button on the remote for 2 seconds.
- The animation will stop and the LED strip will turn off.
- Press the Autoplay button again at your musical cue to begin playback.
For more details, see the Choreography Files section.
Using the Heart / Special Button
The Heart / Special button has two functions.
Press: Change Animation Speed
Press the Heart / Special button to cycle between animation speeds defined by the SpeedToggle option.
This can change how stretched, compressed, calm, or energetic a pattern appears while spinning.
For more details, see the Animation Speed section.
Hold: Save to Favorites
Hold the Heart / Special button to save the currently playing pattern to your Favorites folder.
This is useful for collecting your favorite visuals while you are practicing or performing.
For more details, see the Favorites section.
If the Remote Is Not Responding
If your prop does not respond to the remote, check the following:
- Distance: Move closer to the prop.
- Direction: Point the remote toward the sensor on the prop.
- Sensor visibility: Make sure the sensor is not blocked by your hand, clothing, or the prop itself.
- Remote battery: Check that the remote battery is installed correctly and has power.
- Prop power: Make sure the prop is turned on.
