Motion-Reactive Modes (FutureHoop & FutureFans)
Create Patterns That Respond to Movement
FutureHoop Designer & FutureFans include a motion sensor that can make patterns respond to the movement and orientation of the hoop.
Instead of advancing through an animation at a fixed speed, a motion-reactive pattern can advance as the hoop or fan blades rotate. This makes it possible to create visuals that appear to hover in place, rotate more slowly, drift gently, or move in the opposite direction from the physical spin of the hoop or fans.
Motion-reactive modes can feel a little magical at first. The LEDs are physically traveling around the tubing, but the pattern may appear to remain suspended in the air.
New to motion modes? Start by playing with the included patterns and experimenting with different movements. You do not need to understand the math to enjoy them. The deeper sections below explain how the files work and how to create your own when you are ready.
Seeing four orange LEDs? This means your motion sensor needs to be recalibrated. This can happen whether or not you are using a motion-reactive mode. Follow our motion sensor calibration guide before continuing.
Start Here: Enjoy the Included Motion Modes
Your FutureHoop Designer & FutureFans already includes motion-reactive tracer patterns that are ready to use.
Special thanks to Tyler Neumann @timeddilation for creating the motion-reactive patterns that now ship with FutureHoop Designer & FutureFans and for helping us explain how to create your own.
You can find the included patterns in the folder named 11 motion tracer.
Try spinning through the included patterns while experimenting with different movements:
- spin the hoop/fans vertically like a wheel
- change direction
- speed up and slow down
- isolate the hoop/fans in front of you
- rotate the hoop/fans around your body
- move between wheel-style and globe-style rotations
The patterns may appear to hover, rotate, drift, or respond differently depending on how your prop is moving.
What the Bitmap Patterns Look Like
A motion-reactive tracer pattern may look surprisingly simple when you open the bitmap file on your computer. The included patterns are narrow vertical images made from diagonal stripes, gradients, and repeating color sequences.
The finished pattern files in the current tracer pack are 21 pixels wide and 360 pixels high.
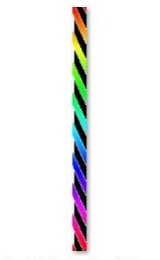
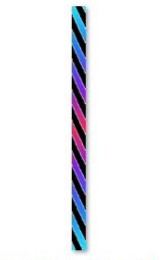
Examples of motion-reactive bitmap patterns. These narrow 21 × 360 pixel images become much more dynamic when the hoop or fans spins.
The diagonal slope is the key. As the prop rotates, the motion sensor advances through the image. The diagonal stripes shift across the LEDs by just the right amount to counteract some or all of the prop's physical movement.
Think of it like walking upward on a downward-moving escalator. You are still moving, but the two movements can balance each other out.
How the Included Pattern Pack Is Organized
The included tracer pack contains several color families, including color loops, color wheels, limerance, sea punk, and sunset patterns. Each family includes multiple variations.
Some patterns fill the full LED strip with color. Others use a narrower window of color or add a contrasting border. Some versions create an anti-chaser effect that changes the visual motion.
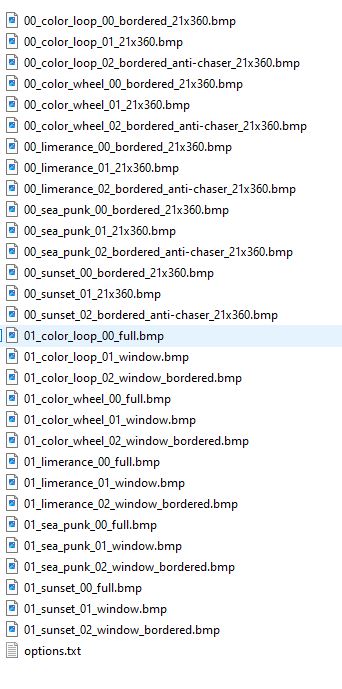
The included motion-reactive pattern folder contains several color families and visual variations. The filenames identify the palette and pattern style.
You do not need to create an entire collection when you are learning. Start with one pattern, test it on your hoop, and make small changes as you become more comfortable.
Make Your First Motion-Reactive Pattern
The easiest way to begin is to make a copy of one of the included 21 × 360 bitmap files and edit the colors while preserving the diagonal structure.
- Connect your Designer hoop or fan to your computer.
- Open the folder containing the included motion-reactive tracer patterns.
- Make a copy of one of the
21x360.bmpfiles. - Rename your copied file so you can easily identify it later.
- Open the copied bitmap in an image editor that can save BMP files.
- Change the colors, gradients, or stripe style while keeping the diagonal slope intact.
- Save the edited image as a BMP file inside the same pattern folder.
- Safely eject the drive of your hoop/fan and test the pattern by spinning the it vertically like a wheel.
Starting with an existing pattern makes it easier to see how the diagonal structure works before building a new pattern from scratch.
The options.txt File
The motion-reactive pattern folder includes an options.txt file that controls how the patterns behave.
The options.txt file for the included tracer patterns. Comments begin with a # symbol and help explain the settings.
The current tracer pack uses:
Autoplay=20
ConstantSpeed = 0
WheelRotationSpeed = 365
GlobeRotationSpeed = 0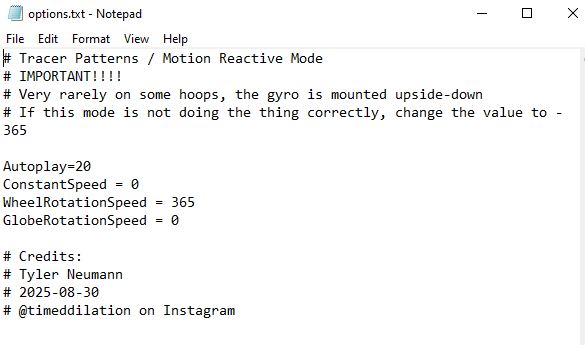
WheelRotationSpeed responds when the hoop/fans rotate like a wheel.
GlobeRotationSpeed responds when the hoop/fans rotate through a globe-style motion. The current tracer pack sets this value to 0, but advanced creators can experiment with it.
ConstantSpeed = 0 allows the pattern animation to be driven by motion rather than advancing at a constant animation speed.
The current pack uses WheelRotationSpeed = 365. This is a tested and tuned setting for the included patterns in the motion tracers folder.
As explained in the advanced sections below, the mathematical starting point for a 21 × 360 pattern is close to 360, but small adjustments can improve the visual effect.
Creative Ideas to Explore
Once you understand the basic diagonal-line pattern, there are many ways to experiment.
Virtual Color Wheel
Create a long rainbow gradient so that a rotation moves through the colors of the spectrum.
Floating Stripes
Use multiple diagonal lines to create bands that appear to hover in place as the hoop spins.
Windowed Patterns
Use a narrower band of color surrounded by black pixels to create a defined moving window of light.
Bordered Patterns
Add a contrasting edge to a stripe or window to make the moving shape appear more defined.
Anti-Chaser Effects
Experiment with alternating colors, borders, or stripe arrangements to create visual movement that contrasts with the physical rotation of the hoop/fans.
Slow Drift
Use a value slightly above or below a perfectly stabilized setting. Instead of locking into place, the pattern will slowly drift.
Counter-Rotating Patterns
Reverse the diagonal slope or experiment with a negative rotation-speed value to make the visual move in the opposite direction.
Layered Globe and Wheel Effects
Experiment with both WheelRotationSpeed and GlobeRotationSpeed to create visuals that respond differently depending on the axis of rotation.
Learn More
The sections below explain the pattern structure, rotation-speed math, prop-specific adjustments, and common troubleshooting steps. Open any section when you are ready to go deeper.
The finished tracer patterns are 21 pixels wide and 360 pixels high.
Tyler originally developed the structure by working with a repeating diagonal tile that was 21 pixels wide and 45 pixels high. The 45-pixel-high motif repeats vertically until it fills the finished 360-pixel-high bitmap.
45 × 8 = 360This gives the pattern more room for gradients, color loops, and repeating visual changes while preserving the diagonal slope.
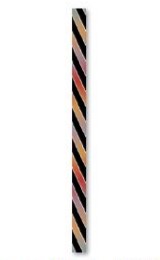
Several included tracer patterns shown together. The gradients and borders change, but the diagonal structure remains visible across the collection.
Understanding Width
The width of your bitmap determines how many times the pattern repeats around the hoop or fans.
A narrow bitmap may tile several times around the circumference.
For example:
21 × 7 = 147A 21-pixel-wide pattern tiles seven times across a 147-position hoop layout.
When the tile width divides neatly into the LED count, the repeated image joins together cleanly. If it does not divide evenly, the pattern may still look attractive, but you may notice a small seam or tear when the hoop completes a full rotation.
Understanding Height
The height of the repeating diagonal motif affects the rotation-speed calculation. A taller repeating motif gives you more room for gradients and detailed effects, but it also requires a higher rotation-speed setting.
Designer rotation-speed settings cannot exceed 500, so some combinations of width and height will not work.
For a basic diagonal motion-stabilized pattern, use this formula as a starting point:
WheelRotationSpeed = MotifHeight × ceiling(LEDCount ÷ PatternWidth)
ceiling means to round upward to the next whole number.
For Tyler's repeating motif:
LEDCount = 156
PatternWidth = 21
MotifHeight = 45

156 ÷ 21 = 7.43
Round upward to 8

45 × 8 = 360
This gives a mathematical starting point of:
WheelRotationSpeed = 360The included tracer pack currently uses:
WheelRotationSpeed = 365The slightly adjusted value is a tuned setting. Use the formula to find a starting point, then test nearby values to refine the visual effect.
For the cleanest possible result on one specific hoop, choose a pattern width that divides evenly into your hoop's LED count.
FutureFans have 42 LEDs, which the 21 pixels of the existing bitmaps divides perfectly into.
If your hoop layout uses 147 positions and your pattern width is 21 pixels:
147 ÷ 21 = 7If your repeating motif is 45 pixels high:
45 × 7 = 315This gives a hoop-specific starting point of:
WheelRotationSpeed = 315Test the result and make small adjustments if you prefer a slightly different visual effect.
If you plan to share a motion-reactive pattern with other hoopers, there is an additional challenge: different hoops may have different LED counts.
A setting that locks perfectly on one hoop may show a small seam or behave slightly differently on another.
To create a pattern that behaves attractively across many hoops, choose a representative LED count and test the mode on several common hoop sizes.
For a 21-pixel-wide pattern, a 45-pixel-high repeating motif, and a representative LED count of 156:
45 × ceiling(156 ÷ 21) = 360This gives a useful broad-compatibility starting point. The current included tracer pack uses the nearby tuned value:
WheelRotationSpeed = 365I see four orange LEDs instead of a pattern
Four orange LEDs mean that your motion sensor needs to be recalibrated. This is a general calibration issue and can happen whether or not you are using motion-reactive modes.
Follow our motion sensor calibration guide to install the latest software version and recalibrate your hoop.
The pattern behaves backwards
Very rarely, the gyroscope may be mounted upside down (this was due to a temporary supply shortage solution, not a manufacturing defect). If the included tracer mode does not behave correctly, open the folder's options.txt file and change:
WheelRotationSpeed = 365to:
WheelRotationSpeed = -365Save the file, safely eject your hoop/fan, and test the mode again.
The pattern moves instead of holding still
Adjust WheelRotationSpeed slightly higher or lower. A small adjustment may produce a more stationary effect or a gentle controlled drift.
The pattern looks correct except for a seam
Your pattern width may not divide evenly into your hoop's LED count. Try a different width or design the seam so it is less noticeable.
The required speed is greater than 500
Choose a wider pattern, a shorter repeating motif, or both.
Example:
LEDCount = 156
PatternWidth = 9
MotifHeight = 30

30 × ceiling(156 ÷ 9) = 540
A speed of 540 exceeds Designer's maximum setting, so this combination is not suitable for that hoop.
The formula provides a strong starting point, but motion-reactive art is also a creative process. A mathematically perfect stationary pattern is only one possible goal.
Try intentionally changing the speed setting, diagonal slope, motif height, colors, borders, and axis of rotation. Some of the most interesting motion modes appear when the pattern almost locks into place, then slowly drifts, bends, or changes direction as the hoop moves.
You can also experiment with GlobeRotationSpeed to create effects that respond to another axis of movement.
